Search the Blog
Network With ReelCast


Films For The Family

Inspirational Web Videos

Film Festival

Blog Archives
Admin Login

Entries in Tips and Techniques (22)

8:00AM

The Three Most Common Mistakes Of Amateur Colorists

Many filmmakers are now attempting to color grade their own work. Here’s why some are coming up short, both technically and creatively.

It wasn’t that long ago that color correction was an extremely costly process that was reserved for high-end productions working with large post facilities. As time went on and the overall cost of software decreased, more and more filmmakers started to take the color process into their own hands — and I can’t blame them. After all, DaVinci Resolve can be had for free (one version, at least), SpeedGrade comes bundled with your Adobe subscription, and there are so many other options out there too — so why not color your own work?

While it makes a lot of sense financially, even creatively, for filmmakers to attempt to color their own work under certain circumstances, there’s still quite a big learning curve involved. If you’re an amateur colorist attempting to brush up your skills, here are a few of the most common pitfalls you need to avoid.

1. The Wrong Order of Operations

The Three Most Common Mistakes Made By Amateur Colorists: Wrong Workflow
Image from Blackmagic

This is probably the number one mistake made by amateur colorists. It’s extremely common for filmmakers without coloring experience to attempt a “look” or grade without first balancing their image. This is breaking the rules of color correction 101.

The absolute first thing you need to do when color grading any piece is to balance all of your shots (contrast, levels, white balance, etc.) so you have a clean slate to work from. Only once your shots are balanced can you go in and set your creative look. If you avoid this step, you’ll never get your shots to match and the look of your finished piece will be very inconsistent.

2. Overdoing Looks

The Three Most Common Mistakes Made By Amateur Colorists: Overdoing Looks
An example of extreme color grading. Image from IMDb

Seasoned colorists understand the art of subtlety. They know how to make an image feel warm and inviting without having the audience notice it overtly. Knowing where to draw the line plays a big part in their craft.

Most amateur colorists will push their looks either way too far or not far enough, failing to find that ‘sweet spot’. There’s a time and a place for more extreme looks on both sides of the spectrum… but in 90% of cases, the best result will be found by keeping the look somewhat natural and organic, while still leaving enough room for style.

3. Using Presets

The Three Most Common Mistakes Made By Amateur Colorists: Using Pre-sets
Image from Blackmagic

Arguably, the biggest giveaway of an amateur colorist is their overuse of presets or filters. Many filmmakers will start their “color sessions” by clicking around on pre-created looks within the software they’re using, and wind up with a very poor-looking final product.

Personally speaking, I never use any presets for my work, though I’ll occasionally use them to spark creative ideas. This is typically the best way to use presets. You can quickly see what type of looks might work well for your footage (saturated, bleach bypass, black and white, etc.) and then start from scratch to build a custom look that’s tailored to your specific shot.

- - - - -
by
(Article Source)

8:00AM

Motion University - Pre-launch

Build a career, not a hobby.

This is a new film training project that I'm very excited to be part of!

Motion University will give you access to an entire new ecosystem of online training. Learn from industry professionals through lectures, interactive Q&A, and weekly assignments. By the end of the program you will also create your own promo video and get an in-depth critique by seasoned filmmakers.

Sign-up to Stay Updated - motionuniversity.org

8:00AM

Flipping The Traditional Documentary Model on Its Ear

By Lydia Hurlbut

Shane and I first met Patrick Moreau at Sundance two years ago when they were both speaking there. There was an immediate connection, the kind where you feel like you have known this person forever when you just met. We both realized his talent as a storyteller and independent filmmaker.

Patrick and the entire Stillmotion team have an amazing project that we would like to share with you. We were so moved by the story of #standwithme, that we wanted to dive into the details of this incredible story.

Patrick-Moreau-Namibia-BTS1

Stillmotion is a studio that started in weddings and is now taking on the world with a documentary about child slavery. Stillmotion’s approach to this film has been to create their own path and push the genre of documentary filmmaking. Deciding against Kickstarter and other popular crowd-sourced funding options, the film was largely funded by Stillmotion through their commercial work. With a production budget of $250,000, the Stillmotion team chose this route to remain focused on the film and tied both emotionally and financially to their belief in the impact it could have when released. Their hope with #standwithme was to blur the lines of traditional documentary storytelling. That meant how the story was told, how it transitions, how it looks, and how it sounds.

The Story

Vivienne Harr is a 9-year-old girl who saw an arresting photograph of two enslaved children in Nepal and decided to take a stand. She set up her lemonade stand for 365 days in a row, asking customers to “pay what’s in your heart,” sending proceeds to organizations that liberate and rehabilitate slaves all over the world.

Vivienne-Harr-Make-a-Stand

Patrick directed this project and took the time to share every detail from initial funding through shooting.

Funding

“We got into this film with the idea we could donate our time to a worthwhile cause and help them make a bigger impact. We heard this story of a 9-year-old selling lemonade to fight child slavery and wanted to go down and learn more. It was always going to be a 5 min piece… but when we met them, we knew it had to be so much more. The challenge was that she was making a stand every day – the story was happening now. We thought about Kickstarter but David, our Executive Producer, felt strongly that we should remain focused on the film. As those who have tried crowd funding know, it certainly needs a lot of time and support and our focus needing to be on telling this story.”

“We ultimately decided to dive in and started by tuning the project ourselves. As the scope grew, we formed a corporation for the film and sold stock, or equity, in the film to help fund our remaining production expenses. This was a way to get the support we needed while still shouldering as much of the funding as we could and remaining focused on the film itself.”

Key Tools

“As we approached the film, there were several tools that really helped us push the boundaries of what you’d expect to see in a documentary. Of course, a great tool doesn’t make a strong story, but a strong story that is well told, with the right tools, can be even more effective at impacting the viewer.”

“As a studio, we wouldn’t have been drawn to making a film that was entirely on slavery. Let’s face it, there are tons of dark issues that need addressing, but we wanted a unique angle into the story that would attract a lot of people to see the film, and therefore have a greater chance to really create change. Vivienne was that window. She was the sparkle into the dark, dark world of slavery. Therefore, our approach was to stay in the light – keep the film feeling bright, inspirational, and empowering with a lot of energy.”

Freefly Movi

“Our film’s main character is a 9-year-old. While that means much of what we would be doing would be unpredictable, it also meant we should be ready for lots of action. The Movi would let us get smooth motion, but more than a Steadicam. It would let us quickly and easily get low to the ground (she is 9 after all). It also let us be unpredictable and follow her tricks and turns. More than just following Vivienne, the Movi could be paired with a lot of moving vehicles on our international trips to create a much larger, epic feeling. While in Namibia, we put the Movi in the front of a chopper with open sides and got sweeping scenics that would be much more costly to reproduce in a high budget feature. While one might expect to see a handheld tracking shot of somebody in a documentary, we were able to use a perfectly smooth camera taking flight over the Kalahari is a big, epic, way to open a scene, all for a $1,000 helicopter rental and a Movi Rig.”

Patrick-Moreau-Namibia-BTS2

Canon C100

“Whenever you take on a project of this significance for your studio (this was our first feature length doc done entirely by our studio) the choice of camera is always a big one. We can be tempted to go Red, bigger, badder – but what serves the story? We knew we had to be quick; we had to be able to travel; and we had to be able to shoot very strong visuals with a small crew. The C100 gave us the ability to pack a 24-70, a couple of cheap 32gb SD cards, and a monopod and get very strong event coverage as we travelled internationally. Shooting in Wide DR, we got great latitude in the image (awesome for bright desert shooting), but we also had built in ND filters to control the light, and great monitoring options like waveforms, peaking, and zebras – all which helped us make sure we were capturing the best image possible. With the higher compression of the C100, these guides were huge in getting it right in camera. Adding on the top handle and running audio into camera let us do some interviews with crews as small as 1 or 2. In Nepal, one of the interviews had to be DP’d, directed, produced, lit, and shot by one person. While we had a volunteer stand in as the interviewer for a proper eye line, the C100 let us handle so many duties quickly and get a strong image. The Red can make great images, but it also takes a while to start up and we would be hard pressed to think it could handle the beating we gave our gear, or the pace of our production.”

Canon 1DC

“While the C100 was by far our main cam, we also wanted something that was even smaller for tight spaces and something that could handle the roughest of weather as we travelled. The 1DC was an amazing compliment to shoot high quality production/BTS stills, as well as shooting for the film in up to 4K. As we shot Viv’s lemonade getting bottled, the 1DC was our go to camera, allowing us to get it literally inside the machines as they were running and spinning out bottles of lemonade. As we go back and review the finished film, the bottling scene has some of the strongest visuals. A large part of that is the strong image (wide range, shallow DOF, and low light) all in camera that could go where others couldn’t. When paired with the Movi, we had a lightweight option that we could lift for extend periods. At one point, we had to follow Lisa, the photographer that took the image that started all of this, as she hiked into the Kalahari on a photography trek. It was a 30 min walk out, shoot, then walk back – in the middle of the desert. Remember, we have no AC, no crew . This was one person with whatever they can carry. Being able to put the Movi in majestic mode (it responds to your movements based on tablet settings instead of using a second operator on a remote) and having it light enough let us work without support for extended periods and got some of the strongest shots you now see in the trailer.”

Raymond-Tsang-Ghana-BTS1

Westcott Icelight and Scrim Jim

“Lighting for a doc is always a battle of time and crew. While we’d love days to draw a lighting plot, scout, and setup lights, a doc often comes with all of that compressed into a matter of hours or minutes. We had interviews of some main characters that needed to be sourced and lit (with a crew of 2) in less than 30 minutes – and needed to match those that had a crew of 5 and hours of prep. Using small and quick lighting tools like the Scrim Jim and Ice Light let us make the most of some difficult terrain and harsh outdoor conditions. For several interviews in Nepal, having a crew of only 2, we chose to do interviews outdoors outside of magic hour. This fit best into the production schedule and gave us a lot of context in our interview – we couldn’t travel to Nepal and shoot in an area that didn’t feel like we were there.”

Stand With Me

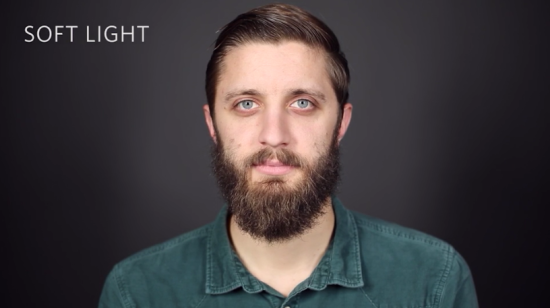
“On the other hand, the Ice Light is a battery powered daylight balanced LED light that offers a nice soft light. While too dim to light large areas, it is a great helper light for treks into the middle of nowhere. While shooting the Bushmen of Namibia, who live in the Kalahari Desert, we were fortunate to spend an evening with them and experience their medicine dance. Lit by only a fire in the middle of nowhere, we could use the power of the C100 to get great low light images. It was easy for the people to fall into nothing with no power or buildings around. Using the ice light and some 12 CTO, we could get a light place in a tree 15’ away to give us a nice edge light and some separation.”

The Kessler Stealth Slider

“We knew going into this that we were telling a story that would be strong in history. We would want to cover the story of how Vivienne’s story started – something documented daily on Twitter and Instagram with images – as well as the history of how Fair Trade USA started. One of our main characters is a photographer with an incredible body of work, and we’d need to show her images in setting up the story of how ‘the image’ that started it all was taken. We knew we couldn’t try and push how documentaries look and feel while having photos that pan and zoom in post. It was too digital and artificial feeling. Instead, we put the images in real and relevant environments and shot them with a motion control slider. This meant our cuts from one image to another would cut perfectly, and we could get very smooth and repeatable slow shots. When it came to shooting Vivienne’s bottles in stores, we went to dozens of stores and again relied on the motion control to get slow, smooth, and repeatable motion across locations. We shot wide, medium, tight in many locations – all at the exact same speed and direction. In the end, we quickly cut through dozens of shots of the bottles across the dozens of stores, and it all flows so well because of the consistency between shots. Add in some sound design in post (kids playing and laughing over Viv’s photo) for a strong emotional depth and compelling visuals of what could have easily just been a photo zoomed in post.”

At its core, #standwithme is a social invitation for people to stand against slavery and invite others to join in doing so. Stillmotion’s hope for this trailer is not that you’ll go out to see this film because it looks like a good movie. Their hope is that 30 million human beings is something you can’t turn away from, and that this trailer will leave you wanting to know more about the issue and how we can all do our part to truly put an end to this suffering.

The #standwithme Premiere Tour will be hitting the road in February, taking the film to 30 cities in the US & Canada. But there’s another tour we think you guys will be even more excited about…

Storytelling With Heart

The Storytelling With Heart Filmmaking Workshop!

The Storytelling With Heart Tour is a one-day filmmaking workshop all about how to use your talent and passion as a filmmaker to tell the stories you REALLY want to tell, and tell them powerfully. The workshop will take place on the day following the #standwithme premiere in each city.

In addition to a live Q&A from #standwithme’s directors Patrick Moreau and Grant Peelle at each premiere, there will also be an educational workshop held the following day in each city, known as the Storytelling With Heart Tour. The workshop tour welcomes anyone who is interested in independent filmmaking and telling meaningful stories, and will be an opportunity to get hands-on instruction and insight from the Stillmotion team on their filmmaking process. Each workshop will run from 9 am-5 pm, on the day following the premiere of #standwithme.

Visit www.Stillmotionblog.com for more information on Stillmotion’s education program and to purchase tickets to the workshop. Use the discount code hurlbut10 to get 10% off of your registration fee. (Code expires December 31, 2013.)

Our friends at Stillmotion put a lot on the line to make #standwithme, but there was never really any question as to why they kept going. They believed in the story, plain and simple.

If enough people are made aware of just how much power they have to stop slavery, even though something as simple as a shift in shopping habits, a global commitment can be made, and together we can make a vital mark. We are proud to be inviting you to stand with us.

Stand With Me

- - - - - - -
(Article Source)

8:00AM

You've Landed Your First Video Job

You’re fresh out of school. You’ve been waiting for this moment for four years, and now it’s happened: you’ve landed your first corporate client. What next? Here are some tips to help you kick things off.

Build your brand

By brand we mean how your company appears from the outside, and what it stands for. A strong brand makes you look credible and helps to create a memorable business that people want to be connected to. Pick a name that stands out, and is related to what you, in particular, offer. Using your own name as a brand is more personable but will potentially attract smaller clients. Also, consider the simplicity of the name: is it easy to remember the corresponding url or twitter handle?

Developing a visual identity is just as important, get a great logo and share it everywhere. Think about corresponding design elements (color, typography, shapes). Finally, a tagline goes hand in hand with your logo and is your promise to your audience - can you explain what you are and what you do in about 7 words?

Promote yourself

When you’re first starting out, you can’t just sit around and hope people will come to you. You need to build a credible online presence.

First, get your website set up. No html or java experience? Fear not. Companies such as Wordpress, Wix, or Squarespace offer stylish and easy-to-use pre-packaged sites.

Next, get your Facebook and Twitter (and other social platforms) presence going, and make sure you post to them regularly. Even if it’s just a “Hey, see what we just did for our latest client!”, or “Check out the new service we’re offering”. This way, clients are always being reminded you’re there and can watch you develop.

Finally, word of mouth is always the best advertising. Every time you deliver a project and see a smile on your client’s face, ask them if they know anyone who might need your services and encourage them to recommend you.

For a few more tips, check out 5 keys to growing your freelance business.

Get your business incorporated

This might sound like a boring bit of admin, but protecting yourself as an individual, or as a husband/wife/parent is critical. When you’re incorporated, if someone sues you for professional reasons, they will be suing the business, and your personal assets will be protected. As a small business owner, you are subject to some of the laws and tax regulations that apply to large corporations. In addition to incorporation, make sure you check out the tax obligations in your location.

Pick your software

While your expertise and comfort levels might guide your software decisions, your budget will also come into play. FCPX (Mac only) is a flat $300 fee, while both Adobe’s Creative Cloud and Avid Media Composer are available on a $50/month subscription plan. Keep in mind that some programs are Windows only (including DVD Architect, pretty much the last prosumer DVD authoring program).

To work out what you need and the best way of buying it, sit down and make a road map of the type of services you’re planning to offer in the first twelve months of your business. Then list the applications you’ll need to do each service. For example:

Jan – April:
Web file creation – Sorenson Squeeze, $X
DVD authoring – DVD Architect, $X
May:
3D animation – Cinema 4D, $X

You may decide that you won’t offer all services right off the bat, as they’ll require more cash up front on software. Update and refer to your roadmap regularly to prepare for the next phase of your business.

Storage

It’s crucial to choose the right storage platforms for the work that you’ll be cutting. Many new editors think, “I’ll just get a large system drive and edit off that!”. Bad idea. You should never have media on the same drive as your OS: if your hard drive is damaged, you’ll lose all your files. G-Raid Technology and La Cie are excellent starting places; they have a range of drives covering a selection of interfaces.

The demo

There is a slight difference between demo reels and a showreel, and both are important. A showreel showcases the range of work that you’ve done and is edited in a snappy, creative way. A demo reel shows the work you can do in more detail and with longer segments, giving clients a clearer understanding of your style of editing. Your demo reels will help potential clients decide if you’re the right fit for the post production on their next job. If you’re an editor that works on different types of productions, make sure you have demos that show each genre.

Manage client expectations

As soon as the project begins, you need to establish some guidelines to ensure things stay on track. Without these, you’ll be surprised at how quickly things can unravel. Develop a timeline and agree on a communication schedule (with all key stakeholders!) and milestone reviews  – this way the the client can leave you to do your work, knowing they’ll be brought in at critical junctures. Finally, once you’ve set attainable deadlines, stick to them. Never over promise and then under deliver – this is a sure recipe for disappointment all round.

Quoting and billing

Consider charging per project instead of per hour. This gives the client peace of mind around the project budget but also, if you work quickly and efficiently, means you don’t risk devaluing your expertise on an hourly rate. A Statement of Work shows that all parties have agreed upon the deliverables and the project price (and anything outside of that will increase the price of the project).

When billing, consider using invoicing software to give you a professional look and make sure everything is calculated correctly. Freshbooks or Xero will help track your clients and the amount of money you are owed. Make sure to include a due date and full details of your preferred payment method on every invoice you send.

Golden rule

Lastly, the most important thing to remember is never work for free. Your time is valuable. A credit in someone’s movie or TV show doesn’t pay your rent, or the lease on your equipment. Don’t be afraid to ask for what you feel you deserve. You might lose a few clients, but the ones you deliver for in exchange for a fair price, will be clients for life!

Kevin P McAuliffe is a three-time North American ProMax award-winning editor and has been a media composer editor for over 18 years. He is a senior editor at Extreme Reach Toronto, whose current clients include Paramount Pictures, Warner Bros. Pictures, Walt Disney Pictures and E1 Entertainment. Kevin can also be found helping out on Avid Community in the Media Composer and Symphony Get Started Fast forums.

(Article Posted by Wipster)

8:00AM

Video Background Music

Background music can do wonderful things for your video. It can help create emotion, drive the pace and flow, and even hide pesky audio edits. But counter to what you may believe, the most successful background music is the music that you didn't even know was there.

0:39


CC

If the volume is too high, the music will overpower the spoken narrative of your video. This… is no good. If background music is too low, it can paradoxically draw attention to itself by making the viewer strain to hear it. The goal of background music to invisibly assist your video, not create a distraction.

Mixing the music volume in your video takes practice, and there's no exact formula for what level the music should be relative to the voice. It's all about training your ears to feel when the music is sitting just right in the mix.

To start your training, play around with this interactive volume video and try to listen for when the volume sits right in the mix...

READ THE FULL ARTICLE

8:01AM

Lighting on the Fly

Keeping things simple and minimalist not only lowers the barrier to entry to making a video; it also makes our video style more accessible to a wider audience.

This minimalist philosophy has a major influence on how I choose to light videos. We've dubbed this minimal, flexible technique "Lighting on the Fly".

When I'm setting up lighting for a video at Wistia, I follow 4 terrifically simple rules:

  1. Make the shot (and the people in the shot) look pretty.
  2. Kill any and all shadows on faces.
  3. Don't intimidate the person on-camera.
  4. Use the most convenient lighting option (it's often best).

Join me on a journey through space and time as we hack lighting and turn the world of traditional "3-point lighting" upside down!

READ FULL ARTICLE

8:00AM

Stuff To Know About Codecs

(article source)
David Kong
here with another video tutorial for you, this time on codecs. I’ve found a lot of confusion and mis-information around the internet about how codecs work, how the differ, and why those differences matter.

Hopefully, this video/post will clear those up. I know it’s long, but I really wanted to break it down and explain things thoroughly, rather than just skimming the surface like a lot of tutorials do. Codecs can sound impossibly complex when all you get is a bunch of numbers and acronyms, but the main concepts at work really aren’t that complicated.

vlcsnap-00008

I explain the concepts behind different types of codecs, but I also give some real-world examples which should help you understand how these algorithms work on a practical level, pulling frames into Photoshop to break them down and examine how our codecs have changed the image.

  • What a codec is - And how it differs from a container.
  • Different types of codecs – And why I frequently use 4 different codecs on a single project.
  • Bit Depth – What it means and why it matters.
  • Chroma Subsampling – 4:4:4, 4:2:2, and 4:2:0, and when it becomes an issue.
  • Spatial Compression and Blocking – One of the most common artefacts you see with normal work.
  • Temporal Compression – Long-GOP codecs, inter-frame compression, and ALL-I codecs.
  • Lossless vs. Lossy compression – How image compression differs from data compression.
  • Bit Rate – How to calculate bit rates and the differences between kbps/kBps/Mbps/MBps.
  • Raw – Briefly, the difference between Raw, compressed, and uncompressed (this could have been a 40-minute tutorial on its own!)

8:00AM

Helpful Ways to Get a Grip on Lighting 2

(Source Article) By Bobby Marko | August 22, 2014

Lighting is an evolving art form. Not only does technique change and advance but so does the technology of how light is produced and generated. Even a decade ago the landscape of production lighting was much different from what it is today. Just like with the cameras that are coming out today, the affordability of owning your own light kit is increasingly becoming more possible. The good news is that you don’t have to own much nor spend much to have a good small light kit to use for many types of productions. Gone is the day of having to have 5K and 10k HMIs and Maxi Brutes on set for many productions. Of course these are still used for high end commercials, music videos and films but more and more you are hearing of filmmakers making full feature films with just some LED and florescent light kits.

Throughout this series I've talked about technique when it comes to using your lighting setup (if you missed the others, read Part 1, Part 2 and Part 3). As I close out the series I want to talk about the lights themselves so you have a better understanding of the tools you have available to you.

Lighting Tips for Cinematographers

Part IV: Types of Lighting Tools

Here in part IV I want to address the issue of knowing what lighting to get for your production. I’ve heard many times from filmmakers that they often don’t know what to get for their productions because (and thankfully) there are many choices and with each choice requires different budgets. I think many filmmakers give up on trying to decide and just get an Arri 4-light kit and they’re done. But knowing what each light is for and putting some thought into your lighting setup will help you make some decisions and be confident in choosing your lighting package. I’m going to break down the post by What are the different types of lights and then for each light talk about How are those lights typically used and Why would you use them for your production. This will not be a comprehensive list as the post would get very long but it will give you a basic understanding of the different types for you to get started. Then, as you need, you can learn more from other resources (and there are plenty out there on the web!).

HMI

Helpful Ways for Cinematographers to Get a Grip on LightingWhat: HMI lights (Hydrargyrum medium-arc iodide… yeah, just remember HMI and you’re fine!) are a standard in film and television. HMI lamps come in all sizes usually as low as 200 watts all the way up to 24,000. They require a ballast to operate and some of the low wattage lamps can even run on Edison power (home/office plugs) but most of them require generators or high amp circuits. They are one of the most expensive genre of lights so often you will rent these for your production.

How: Typically HMI lamps are used to generate daylight or a daylight effect because of the standard 5600K-6000K rating. And because you can go up to a 24k light, they can generate huge amounts of light, 4 times the lumens per watt of electricity over tungsten lamps. Most scenes you see where moonlight or daylight beams projected in the scene are usually HMI lights being used.

Why: I personally have used HMI lights for key lights as well as set lights. They are very versatile when it comes to their use. But you definitely want to use HMI lamps when you need to light a large area of your set. Also if you want to to mimc any kind of moon or daylight, HMI lights are most often the best choice. As I mentioned in part 3 of this series though, get the most wattage you can afford and the least number of lamps. You’ll be amazed how you can use one lamp and create two different light beams with some flags and scrims.

My Favorites:
Arri Arrisun 1.2k, 4k
K5600 Joker Bug 400, 800
Mole Richardson MolePar 575

Tungsten

Helpful Ways for Cinematographers to Get a Grip on Lighting
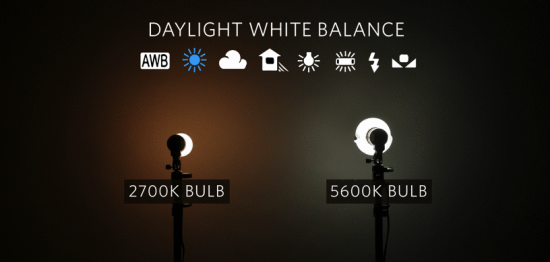
What: Tungsten or Halogen lamps have been used since the birth of cinema because they use incandescent bulbs to generate the lumens and incandescent lighting has been around since the late 1800’s. Just like a typical light bulb in your house, tungsten lighting is a native 3200k-3800k temperature and can run on Edison power. Larger lamps requiring more wattage (typically 2k +) will require generators or larger amp circuits. Tungsten lamps come in a many forms so they are extremely diverse as well as low cost both in purchase and rentals.

How: Tungsten lighting are used in many ways. from particular lighting, to large source lighting, stage, theater, etc. Like HMI lamps, tungsten lamps can be used to light sets and large scenes. Although not as powerful a light with the same wattage as the HMI there are some benefits for using tungsten lamps. They are favored when shooting at high frame rates versus HMI because HMI lamps typically give off a flicker effect when you slow over-cranked footage down to 23.98 or 29.97fps. Also, some filmmakers like the look of tungsten over other lights because of the flesh tones they get from incandescent bulbs

Why: Although I’ve moved away from tungsten as my main source for lighting I still use them. I will often use them for particular lighting, back or hair lights and effect lighting. Even though modern HMI lights have flicker-free ballasts, I’ve read that depending on what speed you over-crank your footage will depend on how effective that setting will be when using HMI lights. So even today, most filmmakers will use tungsten when shooting at higher frame rates, usually above 300fps.

My Favorites:
Arri 4-light kit (150w, 300w, 650w, 1k, should always have one kit on set!)
Mole Richardson Maxi Brute 9 lamp
Dedolight 150w w/dimmer

Florescent

Helpful Ways for Cinematographers to Get a Grip on LightingWhat: Florescent lamps uses bulbs that are mercury-vapor filled and is illuminated when an electrical charge is omitted causing the vapor to glow inside the bulb housing. You often see them in office buildings and in modern times being used in the home. For film and video production they are used to give off a soft light and generate relatively very low heat and consume very low amounts of electricity. For this reason they are very desirable for production. Fluorescents are somewhat inexpensive to own and very affordable to rent.

How: Filmmakers typically use florescent lighting to illuminate their sets in different ways. Many times to replicate a real work setting such as office and industrial sets. But they are also used on medium to close shots to light their subject without generating a large amount of heat as well as to get into small areas such as automobiles and confined spaces. The drawbacks to florescent lights is they do not generate a large amount of light nor can throw light very far so they are often not used to light large sets or exterior lighting.

Why: I love using fluorescents for key lights on subjects when I’m shooting interviews or need to get into a tight areas. With digital cameras now able to shoot at a high ISO without much grain or noise the low amount of lumens sometimes is not a factor. Also, fluorescents give off a nice soft light so having to use diffusers becomes less of an importance. Florescent lamps often come with dimmers so they are very flexible when used as a fill light and you can obtain different temperature rated bulbs so you can match daylight or tungsten should you be using fluorescents with existing lights already in your lighting package. You can also throw some colored gels over the fixture and create some nice glow effects for your set.

My Favorites:
Anything Kino, not the cheapest but they are the best imo!

LED

Helpful Ways for Cinematographers to Get a Grip on LightingWhat: LED lighting has come onto the scene with a vengeance. Above all the other types of lighting I’m mentioning, LED is advancing at a higher rate than any other. LED (Light-Emitting Diode) originally was used for infrared lighting but in the 1960’s began being used for visible light in electronics and small devices. Today they are now being used in film and tv in many ways, even as source lighting. LED lamps, like tungsten and florescent lights can be dimmed but they go one step further. Some LED lights can also change color temperature with simple adjustment. This creates a wider range of use for LED lighting in film and video. Many rental houses are just now warming up to LED lighting so you may not find a huge selection but like fluorescents they affordable to own and rent. With the added flexibility of use over other types of lights, the added cost makes them worth the investment.

How: Many productions today are using LEDs in a variety of ways, source lighting, fill lighting, set lighting, green screen or chroma key capture, special effects lighting and live event. From broadcast or wedding cinematography, you will see LED’s everywhere. Also, all types of productions, music videos, short and feature films, documentaries, promotional videos. LED’s are one of the most versatile lights in the industry. However, LED still cannot throw lighting no produce high amounts of lumens so you will not often see them lighting exteriors or large sets… at least for now.

Why: There was a time I swore off LED because you cannot cut or shape the beam throw. The panel style lamps deter you from attempting this so this limited my uses in my productions. But as of the last few years manufacturers are beginning to change the way you can use LED and slowly but surely I’m using more and more of them in my productions. Though still not powerful enough for long throw lighting or exterior lighting LEDs are great for lighting subjects, backgrounds, confined areas such as small rooms and automobiles and particular lighting. The more modern lamps have gotten better at diffusion so they becoming a softer light, matching the aesthetics of florescent bulbs.

My Favorites:
Socanland NOVA CTD 1x1
Arri L7-C
LitePanel MiniPlus Brick

I hope you have found this post, as well as all the other posts pertaining to lighting useful. I've enjoyed creating and writing this series and hopefully it has given you enough information and tools to get you thinking about lighting for your future productions.
- - - - - - -
(Source Article)


8:00AM

10 Tips from Editors to Directors 

Jonny Elwyn follows-up his popular article on what editors want camera operators to do to help out the process with an equally illuminating piece, this time focusing on the director/editor relationship.

My first article on Redshark News, 11 Things Editors Wish Camera Operators Always Did, seemed to have resonated with quite a few folks, so I thought I'd put down a few more thoughts on the complex creative marriage that occurs when directors are working with editors.

As with any close creative collaboration, personality, experience and personal idiosyncrasies all play a role in shaping how successful the union will be. Sometimes those differences create insurmountable conflict; other times, cinematic magic. But it is the professional editor's role to be what the director needs them to be at any given moment, and although the editor does have the opportunity to shape the final product in momentous ways, his-or-her work should ultimately all be in service of the director’s vision and producing the best possible end result.

With that in mind, here are 10 suggestions for directors on how to get the best from their editors.

1. It's a collaborative effort.
That means I want to bring all that I have to contribute to the project. I want to engage you in lively debate about the best way to shape the project. I want you to be open to trying new ideas and new approaches. I don't want to you to see me as only a button monkey.

2. What you have isn't what you had.
The editor is the one who has to stand in the gap between what the director thinks they have or wishes they had, and what they really have. We can only cut the footage you shot. Our job is to bridge that gap as much as we can.

3. Don't tell me when to cut.
No clicks, claps, points, taps or shouts please.

4. Leave me alone.
I need time to get on with things without you in the room. To get organized, watch through the footage, find the takes I like, try things my way, try crazy things that just might work but probably won't and to have the freedom to take a crack at things without wasting your time.

5. Be available.
If you're on the phone all the time, it's hard to collaborate. I'll need some quality time with you, at the right time, to help get your feedback, thoughts and collaborative energies in a focused way. You're the director after all - it's your project.

6. Be specifically general.
When working with actors it is common practice not to tell them you hated it when they said this word in that way. You'd say "once more with feeling." With an editor, if you say "the scene feels like it lacks energy," then I can go away and do things to amp it up a bit. If you say shave 5 frames off this shot and cut in here rather than there, things tend not to work out so well. Let me fix the note in the spirit of the note.

7. Be generally specific.
Towards the end of a project, it's OK to get more specific and granular with the details of your feedback. We want to make sure you get what you want and sometimes it's easier just to sit with you and give you that, especially if either option is a viable one.

8. Do not touch the screen.

9. Share Your Wisdom.
As an editor I've learnt much of what I know about filmmaking, narrative structure and creative ju-jitsu from the directors I've worked with. Your patient sharing of hard-won wisdom is gratefully received.

10. We sometimes get things wrong.
Usually spelling. I also think my most frequent fault as an editor, when collaborating with a director, is to dismiss an idea as one that "I've already tried and it didn't work…" Instead, I would be wiser to walk through the director's version of the idea once again – either to put to rest that it really won't work, or to be pleasantly surprised that it does.
- - - - - -
(Article Source)


8:00AM

Useful Tools for Editors

By Scott Simmons | March 13, 2014

If you read my Notes From the 2014 Editors Retreat post then you might have seen the mention of a session called Gearheads. This was a fun session where attendees were asked to submit some piece of gear they like or find useful. This could be hardware, software, an app, anything really. I though the Gearheads submissions would make for a great Useful Tools for Editors entry. Here’s some that I made note of.

Read the full article here!

I highly recommend checking out this list, I've used several of the suggestions myself!