Search the Blog
Network With ReelCast


Films For The Family

Inspirational Web Videos

Film Festival

Blog Archives
Admin Login

Entries in Post Production (18)

8:01AM

Know Your Crew: Pitfalls Directors Should Avoid

“Movies are made in post-production.”

While some producers and cinematographers may take issue with this maxim, Nancy Kirhoffer, an accomplished post-production supervisor whose credits include Memento, 50/50 and Bernie, makes a compelling case: “Movies are three things: picture, sound and music and two of those happen in post-production.”

Last week, Kirhoffer spoke to Film Independent Members about the responsibilities of her position. “I basically take over from the line producer. My job is to get the film through post-production. I oversee the editing, sound, music and I make sure it’s delivered.”

Kirhoffer recommends finding a post-production supervisor in pre-production. After all, they’re the ones responsible for helping the film reach the finish line.

“I’ve worked with so many people whose first movies never get finished.” By bringing in a post-production supervisor early on, filmmakers can know what to expect when they arrive at the editing bay, how long they should take to finish the film, and how much they should expect to spend.

“The truth of the matter is whether you spend $100 million or $100,000, the process is the same,” said Kirhoffer. “In that same vein, if someone is going to pay $15 to see your movie in the theater, they don’t care that you only had $100,000. They only want to make sure it’s worth their $15, and there’s an expectation that the film is going to sound a certain way, and it’s going to look a certain way, and you can’t get over that fact. It has to sound good.”

And good sound isn’t cheap. “There is no world where a sound job costs $20,000. No world where that happens. You’re going to need to spend at least $65,000.”

That’s why it’s key for low-budget filmmakers to bring on a post-production supervisor. They need to know, according to Kirhoffer, “the bare minimum that it’s going to cost to get your movie to where you can distribute it.”

To demonstrate just how tricky navigating post-production can be, Kirhoffer brought along her calendar for post on Neighbors 2: Sorority Rising. A variety of stages stretch and overlap, different tasks to accomplish by different points in post-production, comprising a tightly organized period of about 23 weeks from editor’s assembly to finished film.

Or at least, that’s how things should go.

“I call [the calendar] my work of fiction. It never goes this easy, never this good.”

Often, delays are caused by...[read full article]

Daniel Larios / Film Independent Blogger
Source Article

8:00AM

Organize Your Hard Drive

Post Cover

Keeping your assets organized in your NLE is vital, but now you’ve got to organize your hard drive! Here’s a great way to do it.

Keeping your project nice and organized when editing is essential – you never know who you might have to hand the project off to, or if you might have to come back to it much, much later. If it’s not organized, headaches and cursing ensue. Keeping things organized outside of the NLE – on your hard drive or server – is just as vital for passing off a project or archiving it. Here’s a look at one potential project organization setup that I use, plus a free download of the folder structure!

organize-your-hard-drive-cover


Approvals

This folder is for non-final versions that are ready for the client to look over (usually .mp4s in my case).

Audio

There are 4 folders inside the Audio folder:

  • Mixes – specifically for mastered & mixed .wav or .aif files
  • Music - for the raw stock or original music used in the project. Even if you use a master library, I recommend copying the songs in here so they stay with the project.
  • SFX
  • VO

Documents

I put scripts, interview questions, project briefs, casting notes, etc. in here.

GFX

This folder is for any non-footage elements like logos, images, pre-rendered lower thirds/motion graphics, etc.

Masters

Directly inside the Masters folder is where I put the master .mov files – ProRes 422 HQ typically.

There’s also a subfolder called Deliverables: This folder is specifically for non-archival delivery formats needed, like H.264 for web, ProRes or XD Cam for TV station delivery, .m2v/.ac3 files for DVD, etc.

Media

Some people prefer to keep their media in a different place/drive than their projects. If you like to keep it all together, put it in this Media folder, organized by “Reel X” folders to separate card/shoot days.

Projects

This is for all project files, including Premiere/Avid/FCP/whatever, After Effects, Motion, Cinema 4D, Flash, Audition, Soundtrack Pro, etc.

I also like to add subfolders for each program, like so: PR, AE, FCP, FL, C4D, and so on, plus an XML for any XMLs created for program interchange: FCP -> Premiere/After Effects, Premiere -> Resolve, etc.

VFX

This folder is distinct from the GFX folder – I use this for any footage elements like green screen passes, background plates, or non-mograph output from After Effects or Motion (like speed changes, logo blurs, etc.)


Hopefully this system helps you easily manage all of the project assets on our drive. You can download a .zip containing an empty version of this folder structure by clicking here.

If you’d a few more organizational tips fro videographers, video editors, and filmmakers, check out the following links from PremiumBeat!

- - - - -
(Source Article by Aaron Williams)

8:00AM

Video Editing on a Zero-Dollar Budget

I as a (beginner) filmmaker usually produce films on a zero-dollar budget. Part-time work and full-time college doesn’t leave much money to spend on filmmaking. It’s hard to produce a film on a zero-dollar budget, but it is possible. Pre-production is nothing in the pocketbook. Everyone has paper, pens, and an imagination. Actual production is a little tougher. Usually everyone has a camera, whether it is a smartphone, mirrorless, or a DSLR. But if you need costumes, props, or even a good microphone, then the wallet takes a dent. But in post-production is where things get difficult. Creative toolkits like Adobe Creative Cloud offer applications like Premiere Pro and After Effects that the big kids use. There is a free trial, but after 30 days of using it you grow so accustomed to it that everything else looks lame. But there are alternatives out there for editing, and best of all, they’re free!

Non-Linear Video Editors

Non-linear is just a fancy word for editing non-destructively. Which is a fancy word for not damaging the original footage. Anyways, Adobe Premiere Pro is a good example of an Non-Linear Editor (NLE). Usually the standard “free” NLE would be something like iMovie on Apple products or Windows Movie Maker on Windows based products. Although both these NLEs can produce good results, I think they can limit one’s imagination. So here are three alternatives to expensive NLEs.

  1. Adobe Premiere Pro CS2 Courtesy of www.imgkid.comCourtesy of www.imgkid.com

    Yep, that’s right. Premiere Pro is at the top of this list. A while back, Adobe’s licensing servers for CS2 had a technical difficulty, and instead of fixing it, Adobe decided to release that software suite for free. Although it’s 5 versions old, it stills works like a charm. It doesn’t have some effects like Warp Stabilizer, but many of the major features are there like color correction and non-linear editing. There is versions for Windows and Mac OSX, but the version for Mac doesn’t work with newer releases of the OS. The Windows version works all the way up to Windows 10. You will need a free Adobe account to download it, but that’s worth it for the product you get.

    Download: https://helpx.adobe.com/creative-suite/kb/cs2-product-downloads.html

  2. BlackMagic DaVinci Resolve 12 Courtesy of www.cinema5d.comCourtesy of www.cinema5d.com

    DaVinci Resolve is a program designed for color correction and grading but recently has included the ability to edit video like any other NLE. Originally, this software came bundled with BlackMagic’s cameras but now they are offering a free version or a paid studio version on their website. They offer versions for Windows and Mac OSX. The software is resource intensive though, so it is recommended you have a somewhat powerful computer to use it to its full potential. Although you have to register to download the software, that is again a small price to pay for a great piece of software.

    Download: https://www.blackmagicdesign.com/products/davinciresolve

  3. HitFilm 3 Express Courtesy of Film Riot (YouTube)Courtesy of Film Riot (YouTube)

    HitFilm once started out as a professional NLE, with visual effects, and 3D compositing but now, they split the product into two separate items: Pro and Express. The Express version has all the features of the Pro version like 3D compositing, but to add effects to the program, you need to pay a small amount for a certain package. There is a free built-in effects package that covers a few things, but for serious visual effects you might want to see the next section on compositing software. They have both Windows and Mac OSX versions, but to download it, you need to share a link to their product on a social media network.

    Download: https://hitfilm.com/express

For a list of free Video Compositing Software and Audio Editing Software...Click Here.

- - - - -
(Source Article by Joe Turman)

8:01AM

Adobe Premiere Pro - 2015

Premiere Pro features a new color workspace featuring the Lumetri Color Panel, which allows editors to manipulate color and light in new and innovative ways, at any point in the editing process, without leaving the application. Combining new color technology based on SpeedGrade with familiar Lightroom-style controls, applying simple looks and manipulating parameters to achieve the perfect aesthetic has never been easier, and you’ll see beautiful results in just a click or two. You can take it further with curves and hue/saturation controls, and the new Lumetri 3-way color corrector. And if you want to do more, you can use Direct Link to take your project into SpeedGrade for additional refinements.

Unsightly jump-cuts in talking head interview footage might just be a thing of the past with the addition of Morph Cut, which uses face tracking, frame interpolation, and some Adobe magic to create seamless transitions that previously would have seemed impossible.

The introduction of CC Libraries to Premiere Pro (shown in After Effects in the link) allows you to access and use looks and graphics wherever you are. Use the amazing Project Candy mobile technology to capture the look of a location or picture, jump into Premiere Pro’s Libraries panel and see the look sync’ed via Creative Cloud, and just drag it to a clip to apply. You can easily share looks and graphics from Photoshop and elsewhere between projects, team members, and across other Adobe applications for seamless access and collaboration.

An improved workflow to bring your video projects that you created on your phone from Premiere Clip, Adobe’s editing app for iOS devices, means you’re only two clicks from bringing your project into Premiere Pro to use professional editing tools.

You can now easily toggle between new task-oriented workspaces, optimized for the task at hand (whether it be editing, color work, and more), using the new workspace switcher.

As you’ve come to expect from Premiere Pro, you can work at any resolution without needing to transcode, and a host of newly supported native formats, including new support for Canon XF-AVC, and Panasonic 4K_HS, streamlining your path to getting creative.

And the features don’t stop there. Editors who work with Closed Captions will now be able to burn them into video on export, and a number of editing refinements like the new composite preview during trim, simpler keyboard-based numerical input, Source Settings now showing as Master Clip Effects, and improved AAF exports help you focus on simply making beautiful content. You’ll also find audio routing is easier thanks to improved audio routing UI, and an improved Audition workflow featuring Dynamic Link means moving between Premiere Pro and Audition is easier and faster than ever. Users of Windows-based touch devices will benefit from the first steps being taken towards a more touch-friendly editing experience, allowing editors to perform tasks like moving clips in the timeline and scrubbing the play-head by directly touching the screen. And editors who work with third-party I/O devices will experience significant Mercury Transmit performance enhancements.

One final piece of Adobe magic allows you to alter the duration of an export by up to 10% in either direction while maintaining quality. Time Tuner lets you target the precise duration of your required output without needing to perform time-consuming micro editing, by automatically adding or removing frames in areas of low activity, providing results of the highest possible quality for broadcast and elsewhere.
- - - - -
(Source Article)

8:00AM

Saving Time and Money in Audio Post

By Woody Woodhall

Some picture editors say “I don’t do sound.”  Other picture editors storm into the bay and insist that as much of their edits, effects and automation as possible from the AAF remain so that their “audio doesn’t get [screwed] up.”  I am much more interested in working with the latter than the former.  I can tell by looking at a few moments of their output movie file, without even opening up the AAF, what their timeline will look like in Pro Tools. Typically an excellent picture edit means a well thought out edit timeline.  Thankfully, there are a lot of really great editors out there.  There are however, a few things that can help save some time and money when the project gets to audio post.

INDIE filmmakers wear many more hats than just one. Writing, producing, directing, editing and more... they typically will have more time than money.  For those of us who work in audio, one of the first main hits on the budget typically occurs in the sound department.  Location audio suffers immediately, budgeting less experienced crew, less expensive gear and usually a distinct preference for the visuals over the audio.  Post audio will also suffer since it is last in the chain and budgets are exhausted at that point.  These budgeting constraints can leave the audio recordings and mixing and re-recording in a precarious situation. 

Meticulous picture editors will slave over their sound as much as their image choices and montage.  If their picture edit is good then generally their AAF (or OMF) will be neat, organized, have a logic unto itself and best of all - sound good.  If their picture edit is sloppy, not well timed to the music and effects, and mic choices all came from a composite track and not an ISO track, it might take some work to get the AAF into a Pro Tools session to edit and mix.

Obviously, a picture editor who takes the position of “I don’t do sound” probably isn’t the most experienced or celebrated editor on the block.  Sound and picture in the work that we do comes as a package.  They may not do sound well, but no matter what, they indeed do sound.  Every dialog take that is chosen, all of the sound effects that are added and every music cue that is spotted and cut, sloppy or not, is a key choice in the final project.

Post audio can be an expensive endeavor.  Its always a good idea to minimize the time spent at a facility since time is money.  If the editor has spent quality time on the audio editing during the picture editing, that will help enormously in the post audio process.

Mundane tasks like cleaning up stray, unused and unwanted audio from the timeline prior to AAF or OMF export is an obvious one.  There should also be a logic and consistency in the track layout.  A simple solution is to dedicate separate tracks to dialog, tracks to effects and tracks to music as well as specific tracks for mono sources and stereo sources.  Often the translated audio in an AAF is no longer stereo interleaved.  Many picture editors do not take this into account.  Sound editors and mixers don’t care about split mono files, except when they are laid out in an illogical manner.

This illustration of an extremely simple edit may help to explain this.  There are stereo and mono elements bundled together here.  And are laid out in an inconsistent manner as can clearly be seen.  In an uncomplicated edit such as this these things can be quickly sorted out by the sound editors.  But if it is an effects intensive show with many mono and stereo elements this can slow things down considerably.  Instead of a quick highlight and drag to stereo or mono tracks in a Pro Tools timeline, individual audio elements must have their sound field determined and then be sorted, one by one.

Track lists that are well thought out and organized and then followed accordingly throughout the picture edit can speed the process.  Not paying attention can have the unintended consequence of improperly checker boarding the stereo field of the files.  What was stereo left on one track just moments ago is now stereo right later in the timeline.  Multiply this practice by hundreds, if not thousands of elements, then the time spent sorting can be considerable.

If sound editors normally do this kind of sorting then why is it a big deal?  Time and money.  A sound house will have to do it in the course of preparing for the mix.  However, It doesn’t make economic sense to be potentially paying top wages for work that could have been done in house prior to the sound hand off.

The dialog tracks, location audio cut by the picture editor, can often be organized with no particular order in mind.  If location dialog were recorded with a boom and a lavaliere, it is an excellent practice, to keep the boom on one particular track and the lavaliere on another.  Sounds logical.  Reasonable.  Practical even....  However, many times, I’ve encountered a changing track order for the various microphones - not only within the entire show edit - but also from within a single scene!

This can soak up many hours of time sorting things out what.  Sound editors will not simply look at waveforms to determine which is which.  The absolute best recording for each audio element must be used.  If there are thousands of small bits of dialog that are not properly labelled, sorted and cut, it can take time to figure it all out. At a mix facility that extra time can translate into extra costs. 

Often the duties of the audio preparation for mixing is tasked to someone who might have never seen a non-linear edit timeline opened in a program like Pro Tools.  It’s understandable that if the person has no experience with how an AAF or an OMF opens on the audio side then the preparation can suffer.  Although AAFs and OMFs are wonderful file types for moving media between systems and programs, at least for audio, they can be sorely lacking.

Another essential element for the edit timeline is to include the various roomtones for each scene on a separate track in the AAF or OMF.  Roomtones are something that I speak of regularly since it is not an optional part of sound editing but rather an integral part of it.  Roomtone is the glue for all of the dialog editing and mixing.  If there is dialog re-recording or if there is Foley added then roomtone is essential for the sound mixing.  It is sometimes hard to find. I have asked location recordists about this and I am always assured that roomtones were recorded for each scene.  Many of of the AAFs that I receive from picture editors do not include roomtones.

....Read the full article here!

8:00AM

Serve India Ministries

This summer I had the opportunity to oversee the post-production of a series of web videos for Serve India Ministries. We had a team of 9 people (plus siblings) all working together in one location for a week to finish 7 videos. To start the week we all worked on editing and for the last coupld of days a few of the team members transitioned over to sound, color correction, music, and motion graphics. It was a great time of film-making, fun, food, and fellowship!

Check out the trailer for the series and visit the website to see all the videos!

The people of India sit in darkness. They face incredible difficulties – socially, physically, and economically. No matter the difficulty, the Gospel is the answer. When the Gospel comes to these people, it truly changes everything.

ServeIndiaMinistries.org

8:01AM

Beyond the Mask - Visual Effects

Get ready to be blown away. I definitely was when Aaron took me on a VIP tour. Tour of what? The Beyond the Mask classified visual effects archive room. “We built some awesome sets for the film. Now we’re just making them awesomer,” Aaron told me. He didn’t notice that I had sneaked my smart phone into the room and I snapped a few photos to show you.

Ok, so we weren’t in an archive room; what he showed me was all on his laptop . . . but it was incredible! But let me tell you about it so you can be as excited as I am.  And I do have some top secret pictures to share. Don’t ask me how I got them. . .

The highwayman rides into Philadelphia.

The highwayman rides into Philadelphia.

After I had seen what the visual effects team is creating, it was time to do some investigating. So, I decided to talk to one of the expert artists on the team to find out just how this all works.

Meet Chris Arnold. He’s the lead 3D artist on the Beyond the Mask visual effects team. I was planning to set up a telephone interview with Chris, but switched my plans to involve Skype when I realized that it would be an international call. Chris lives in Ontario, Canada, and is a skilled artist in his field. Chris describes his job this way. “A 3D artist is a generalist set builder and animator that can create a virtual world. My role with a lot of the visual effects shots is to create building assets in CGI.”

Chris works on the prison ship sequence.

Chris works on the prison ship sequence.

Beyond the Mask will employ visual effects to enhance its story, as most films do today, but I wanted to know what the scale of this project was. How many visual effects shots are there in the film? I asked Chris. “I know that we have over seven hundred visual effects shots in the film, but you should talk to Luke, he could get you the exact numbers,” Chris says. Luke is the Visual Effects Supervisor and has been working out of the Beyond the Mask postproduction command central near St. Louis since August. So, I contacted Luke to find out just how large this project was. “We have 741 VFX shots currently, which totals around 65,000 frames of visual effects.  This equals approximately 50.1 minutes of play time on screen.  We have 27 artists on our internal team and are outsourcing some larger sequences to two other VFX post houses as well.” Obviously Luke likes numbers, and as his statistics might show, he is a bit of a computer whiz. Wow. The team is definitely taking this film up another level in excellence.  That’s more visual effects shots than there were in the film Inception!

There are several sequences that Chris is directly involved with. “We have the rooftop chase sequence. We have the prison ship sequence and quite a few others,” Chris said. “We can make it feel much bigger and epic and photo real. For the rooftop chase, we have created over fifteen different 3D models for actual buildings of the time period that are then placed in the scene to create these massive city shots so that we can render them out and populate this 18th Century Philadelphia world.”

I got to preview the rooftop chase sequence, so I followed up on it to see how the visual effects add to this one piece of the film...(continue reading)
- - - -
Source Article

8:00AM

10 Movies With Mind-Boggling Miniature Effects

Filmmakers are, by nature, liars. They’re masters of misdirection and optical illusion and whatever on-screen flim-flammery is necessary to get the shot. Which is why, even in our CG-heavy age, the miniature special effect is still in (occasional) demand. Recent movies like Inception and The Impossible proved that the use of small-scale models to simulate large-scale cinematic visuals is not only viable, but can even be preferable to all-digital approaches. After all, the best miniature effects provide the sense of weight and realism that computers often can’t. Here are 10 films whose use of miniatures is so subtle, we’re still kicking ourselves for believing that cars can fly, and that entire resorts, mountains, and cities were harmed in the making of these movies.

[NOTE FROM REELCAST: This is not an endorsment of any of these films.]
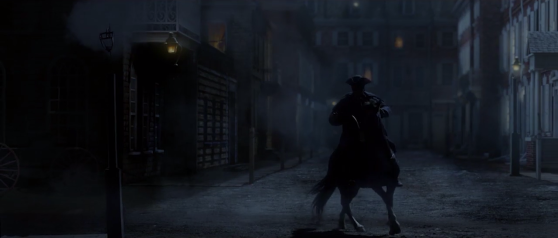
1. Blade Runner

Courtesy of The Single-Minded Movie Blog

By the time Blade Runner bombed at the box office, the use of miniatures in movies had been well-established. Close-up shots of tiny models were popularized by WWII and Godzilla films, and honed to a science by Star Wars and the motion-controlled camera rigs that Douglas Trumbull and his special effects crew pioneered. It’s no surprise, then, that Trumbull was behind the flying cars, or Spinners, in 1982’s Blade Runner.

Though some shots featured a full-size prop, many of the in-flight and zoomed-in shots were of a 44-inch-long replica. Trumbull’s master stroke, though, is the use of bright, flaring lights on the miniature Spinner, partially obscuring the model while also creating a sense of dynamic, cop-car scale.

2. Indiana Jones and the Temple of Doom

Courtesy of The Single-Minded Movie Blog

It was 1984, and we were gullible, easily tricked into thinking that Indie and company really were tearing through tunnels in a minecart while other carts full of bloodthirsty cultists gave chase. But the majority of that sequence was done with action-figure-size models (of both the good and bad guys) in 10-inch-long cars.

As with most miniature shots, the trick, apart from the painstakingly detailed models, was to slow the camera’s speed to match the smaller scale—for many shots, Industrial Light and Magic (ILM) jerry-rigged a Nikon F3 still camera, cutting its motor speed by two-thirds.

3. The Abyss

Courtesy of The RPF

In retrospect, of course The Abyss was packed with miniscule versions of massive vessels. This was 1989, long before Titanic and Avatar gave James Cameron the kind of clout that could launch a thousand full-scale ships. So most of the vehicle shots feature models—for example, the 1/8-scale mini-subs that, like Blade Runner’s Spinners, were studded with working lights, and that also housed projectors, to display pre-filmed images of the actors against the inside of the domed cockpit windows. Even visuals that audiences might assume were breakthrough CG work, such as the iridescent “alien” vessels, were simply detailed models, many of them shot moving through smoke to simulate underwater murk.

4. Back to the Future Part II

Some miniature effects lose their magic once you know what to look for. That’s not the case with the swift, but completely mind-boggling night-time shot in 1989’s Back to the Future Part II, when the flying DeLorean comes in for a landing, with no visible cuts between the car hitting the road and the actors piling out. The shot starts with a 3-foot-long scale model, which swoops in and touches down. It passes behind a streetlight, which masks a split-screen effect—the car that emerges on the other side of the pole is a full-size vehicle, part of a completely different, but perfectly matched shot.

5. Independence Day

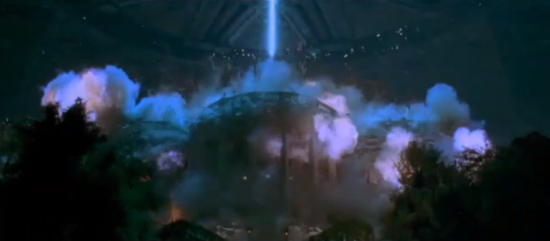
Roland Emmerich’s strangely gleeful detonation of the White House—a 1/12-scale miniature—gets all the glory, but the real highlight of Independence Day’s Oscar-winning visual effects comes during the on-screen carnage in New York City, when a wall of flame is shown rolling through the streets. It’s a dazzling trick of forehead-slapping simplicity: the modeled cityscape was tilted sideways, with downward-aimed cameras perched above. So as the fire bloomed upwards, climbing the miniature environment, it looked as though it was spreading laterally. The final effect is as physics-defying as an alien bombardment should be.

6. Titanic

Courtesy of Jeff DiSario

Though Peter Jackson and his Weta Workshop special effects company later tried to coin the term “bigatures,” in relation to giant miniatures, James Cameron and Dream Quest Images might have beat them to it, first with a 70-foot-long nuclear submarine model in The Abyss, and then with a number of large models in Titanic, including a 1/8-scale replica of the titular ship’s stern jutting up from the water (after the vessel has snapped). Positioning seaborne extras in front of the sprawling miniature allowed Cameron to avoid a composite, green-screened shot. Other scenes used various other partial or full replicas, with the biggest complete miniature of the ship stretched 45 feet (or 1/20 scale, above).

7. The Lord of the Rings: The Return of the King

Courtesy of Weta

All of The Lord of the Rings movies employed so-called bigatures, a term coined by a Weta Workshop model-maker to describe the 9-foot-high miniature of Barad’Dur, castle home of Sauron and perch for the villain’s baleful, all-seeing eye. Nearly every memorable environment, including Helm’s Deep, made extensive use of models, but Weta’s crowning achievement in miniatures is arguably the city of Minas Tirith (above) in 2003’s The Return of the King, which stands 14 feet tall at its highest tower, and sprawls some 30 feet wide, with as many as 1000 houses dotting its bulk. The besieged city is often shown surrounded by a CGI landscape, forming the basis of composite shots, and portions of it were hyper-detailed enough to stand up to extreme close-ups.

8. The Dark Knight

Courtesy of Behance

Christopher Nolan is famously averse to all-digital VFX, opting for air-launched miniature Batmobiles (or Tumblers) in Batman Begins and a memorable midair, multi-plane stunt in The Dark Knight Rises. But maybe the best, most deceptive practical effects sequence in Nolan’s Batman trilogy happens during the underground chase scene in 2008’s The Dark Knight. The Tumbler slams into a garbage truck, then swings around, skidding and speeding down the tunnel. The car, truck and tunnel are all 1/3-scale models, built by New Deal Studios, with motion-controlled cameras zipping along tracks alongside and behind the action.

9. Inception

For the climactic explosion of a mountaintop hospital (actually a figment of one character’s dreaming imagination) in 2010’s Inception, Christopher Nolan once again tapped the miniature-builders at New Deal Studios. The crew built a giant 1/6-scale model, topping 40 feet, mountain included, and then blew it up. But that was just the rehearsal. New Deal rebuilt and remounted the miniature, and destroyed it again, in a 5.5-second-long detonation sequence, filmed at 72 frames per second (two to three times normal filming speed, with the shots later slowed down to match the scale).

10. The Impossible

Image courtesy of FX Guide

While disaster movies like Deep Impact and 2012 have demonstrated menacing, purely virtual tidal waves, nothing comes close to the devastating tsunami sequence in 2012’s The Impossible. To simulate the initial impact of the 2004 tsunami on a Thai resort, Magicon GmbH created a handful of 1/3-scale bungalows, as well as the surrounding trees and nearby pool (above). The crew then dumped a million liters of water on their creations, creating a 1.5-meter-high wave.

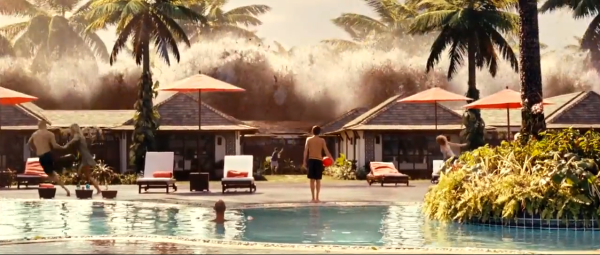
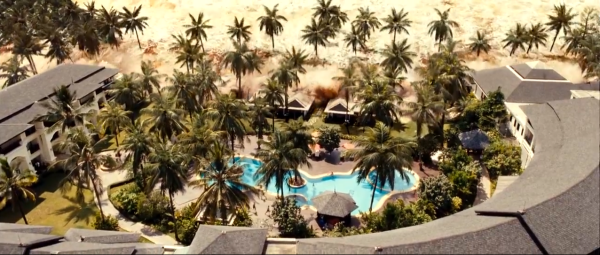
CG artists added poolside umbrellas and additional trees, but the (perceived) scale of the destruction, including the way the miniature buildings are left shattered and skeletal, is more convincing than its bigger-budget equivalents.

...Read the full text here!
9:00AM

Apple - Mac Pro

"A sneak peek at the future of the pro desktop."

When we began work on the next Mac Pro, we considered every element that defines a pro computer — graphics, storage, expansion, processing power, and memory. And we challenged ourselves to find the best, most forward-looking way possible to engineer each one of them. When we put it all together, the result was something entirely new. Something radically different from anything before it. Something that provides an extremely powerful argument against the status quo. Here’s a sneak peek at what’s next for the pro computer.

Even if you aren't interested in the Mac Pro, it's worth visiting the website (and scroll down) to experience the creative and amazing sneak peek they've put together!

Click Here to read more!

11:07PM

Apple - New Updates


Apple has announced it's next lineup of updates for Mac OS, iOS and more! Despite all the negative speculation regarding the tech giant's ability to stay ahead of the pack, Apple appears to still have a bit of "the sweet sauce" that keeps users coming back.

Here is a new ad they created about the mission of Apple.

Click Here to watch the full keynote from Apple CEO, Tim Cook.

Click Here to read about the annoucements on Engadget!